

How To Make An Anime Girl In Gimp

Learn to create animated GIF cartoons using Inkscape and GIMP.
Concluding month, you learned how to create cartoons using Inkscape ('Caricaturing using Inkscape', OSFY, July 2017). In this article, let's become further and acquire how to create animated cartoons using both Inkscape and GIMP. The output for these animations will exist the popular and Web-friendly GIF format.
GIF frames and GIMP layers
An blithe GIF file is a collection of image frames that are displayed for a specific time period, one after another, to create the illusion of a video. In terms of GIMP, each image frame in a GIF file is a layer. If y'all programme on creating GIF animations with GIMP, you demand to create several image layers.
So, what is a layer? Graphics artists prefer to identify various components of an image separately in what is known as a layer. This enables them to modularise images. Several layers are placed 1 over another to grade the concluding image, every bit shown in Figure ane.
If you find carefully, you will find that each layer has been given a different name. GIMP automatically generates a unique name for each layer but the graphics artist commonly renames them in a more meaningful way. Nonetheless, when creating an animated GIF file, you lot do not have to worry nearly the names for the layers. Instead, you lot need to pay more attention to certain actress information that is suffixed to the layers' names, i.e., frame disposal and frame duration.

GIF frame disposal and duration
Frame disposal tells the GIF-rendering application (usually an image viewer or a Spider web browser) how to brandish a new frame over the previous one. Frame duration specifies exactly how long a frame needs to be displayed.
In GIMP, frame disposal is specified by suffixing the layer name with "(replace)" or "(combine)". The starting time suffix option "(replace)" totally clears the previous frame before displaying the current frame. The second suffix option "(combine)" ensures that the electric current frame is merely pasted over the previous frame. The second option allows you to make cumulative changes over several frames and restrict groundwork content to only one of the previous frames. The frame duration is specified in microseconds. For instance, to brandish a layer for a second, you need suffix the layer proper noun with "(1000ms)". Putting information technology all together, if y'all desire a layer named "Frame iii" to totally replace the previous frame and be displayed for half a second, y'all will accept to name the layer "Frame iii (supplant) (500ms)".
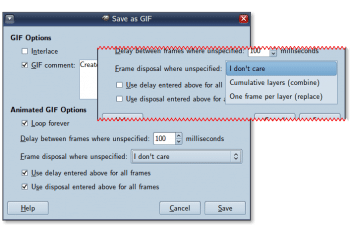
It is non necessary to specify these suffixes manually. When you lot consign a .XCF (GIMP project) file to .GIF format, GIMP volition evidence a dialogue box in which you can specify the settings for the layers en masse or globally.


Drawing cosmos in Inkscape
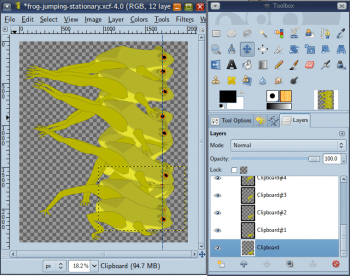
For this article, I decided to create an blithe drawing of a jumping frog. The cartoon was created in Inkscape and assembled as a GIF in GIMP. The diverse stages in the cosmos of the frog in Inkscape are displayed in Figure four.
In Inkscape, I selected all the shapes of the frog and made them part of a group (by selecting 'Object – Group' from the menu). This made it easier to duplicate the frog (Ctrl+D) and create different stages of the frog'due south movements. In each stage, I made changes to the frog'due south legs, using the 'Node' tool. The torso of the frog (i.due east., excluding the legs) was in a sub-grouping, which remained as a whole in all the stages and was not modified. However, its position and orientation to the legs was changed.
GIF assembly in GIMP
Later on all the stages were completed, I exported the Inkscape drawing to a PNG file. I and then opened this PNG file in GIMP, cut the various stages of the jumping frog and placed them each in a carve up layer. I added a vertical visual guide and aligned the frog's eye to it in each layer. This would create the illusion of the video camera following the moving frog. I saved the image to GIMP's native file format (.xcf extension).
To test the animation, I used the Filters – Animation – Playback menu option. The PNG image I exported from Inkscape was a huge one. GIF files are unremarkably small. Hence, I downscaled the XCF epitome (without saving the file) and exported that to GIF format. In the Save/Export dialogue box, I set the global frame disposal to 'Supervene upon' and the global frame interval to 100 milliseconds.
Getting creative with GIFs
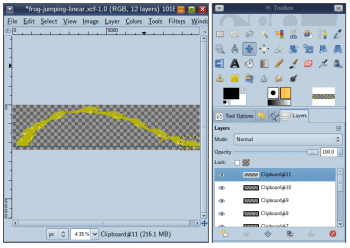
I likewise created some other GIF animation with the same layers. This fourth dimension, I spread them out linearly so that it appeared similar the frog was moving across the screen.
And so, midway in the layer stack, I introduced another frog. Hence, half the frames had two frogs. This made the animation announced like an countless stream of frogs. The final GIFs cannot be displayed in impress, as they are blithe. Yous can get them from www.vsubhash.com/osfy/gifs .
Stealing ideas from other GIFs
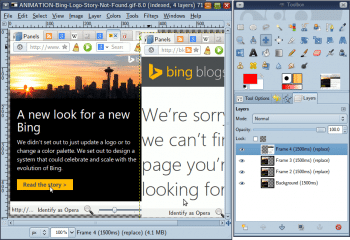
GIF files do not need to be blithe cartoons. GIF does not intendance what is in the frames. As you lot can encounter in Effigy ii, GIF frames tin incorporate screenshots or even photographs. However, retrieve that the GIF format uses a 256-colour palette and rich colours volition be downward-sampled. Still, GIF is a good choice for Spider web graphics and non-interactive animations.
And, just as Web programmers use the hallowed View Source selection to learn cool tricks from others, you can also open downloaded GIF files in GIMP and learn from the experts in the field. If you adopt to go that way, then be sure to change the colour mode 'Indexed' to 'RGB (View – Mode)'. If you forget to change this setting, and so the image colours volition appear like they are read-only.
Source: https://www.opensourceforu.com/2017/09/create-animations-using-gimp/
Posted by: ludwiglikeriatues.blogspot.com
0 Response to "How To Make An Anime Girl In Gimp"
Post a Comment